
Git commit signing
TTS strongly encourages all git commits to be cryptographically signed. A cryptographic signature is a strong indication that that the work was authored by the person claiming to have authored it and that it has not been changed since they authored it.
Signing requirements
GitHub repositories throughout TTS are monitored by a configuration-management tool called , external,Allstar. If your team's repository is managed by Allstar, it will require commit signing.
Managing your keys
We strongly recommend using a password manager to manage your signing keys. , external,KeePassXC is approved for use at GSA and it fully supports managing keys.
Using GitHub on the web does not require signing
If you only use GitHub from the web interface, you do not need to configure signing. The web interface automatically signs your work for you.
If you do any work with git repos on your local computer, however, you need to set up commit signing.
1. Create your keys
Cryptographically signing your commits requires creating a pair of keys. One of them is your private key, and you must keep it secret. Think of it much like a password – only you should ever have access to it. Anyone with this private key can sign with your identity, so protect it!
The other key is your public key, and it may be shared widely. In fact, in order to verify your signed commits, others will need access to your public key.
- Open a terminal window and enter the following command, substituting your own email address:
ssh-keygen -t ed25519 -C "[YOUR EMAIL]@gsa.gov"
About the cryptographic algorithm
- You will be asked where to save the key:
Enter file in which to save the key (/Users/[username]/.ssh/[key name])
- If you are using a password manager like KeePassXC, it will be more convenient if you change this path. Type
/Users/[username]/Desktop/git-signing-key. ([username]is your login name on your laptop.) - If you are not using a password manager, type
~/.ssh/git-signing-key.
- Next, you will be asked to provide a password for your key file.
- If you are using a password manager, simply press enter to have an empty password. You will need to press enter a second time to confirm. Since it will be stored in your password manager, the key is protected by the password manager itself and does not need its own password.
- If you are not using a password manager, enter a strong password. You will have to confirm the password. This step protects your key in the event that a bad actor obtains it – they won't be able to use it without the password.
2. Set up your keys for use
Using KeePassXC
1. Set up KeePassXC to manage your SSH keys
- In KeePassXC, open Settings (
⌘+,on macOS, or the settings are located under Tools -> SSH Agent in KeePassXC for Windows). - Click the button on the left sidebar that says SSH Agent. Ensure the Enable SSH Agent integration checkbox is checked.
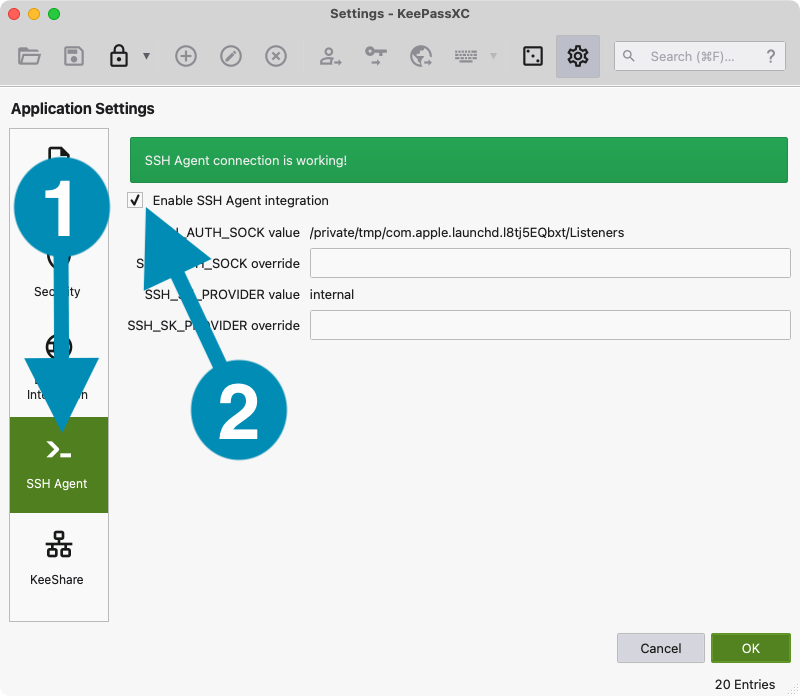
- Click the OK button at the bottom.
2. Add your keys to KeePassXC
- Add the keys to a KeePassXC entry.
- If you already have an entry in KeePassXC for your GitHub account, double-click it to open it in editing mode.
- Otherwise, create a new entry using the + (Add a new entry) button in the top bar.
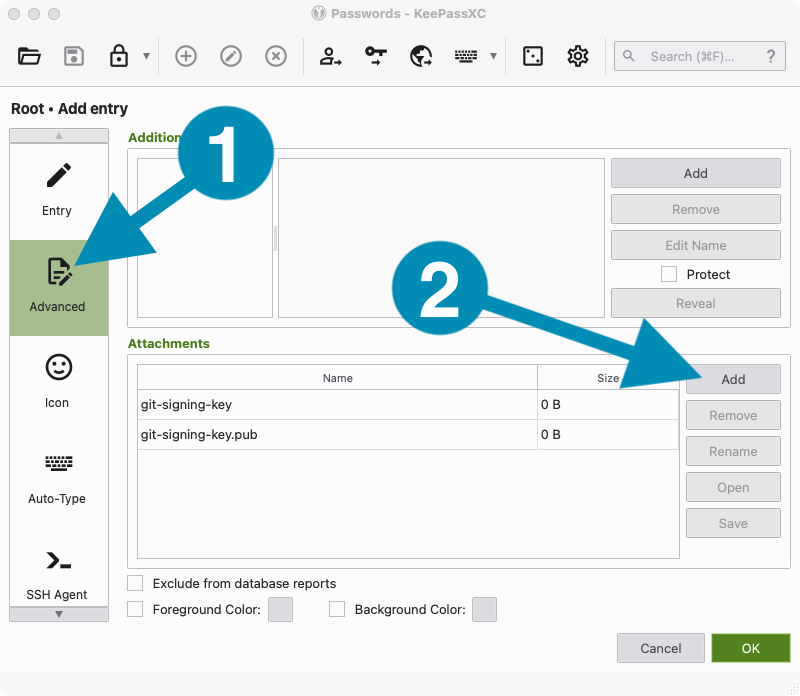
- On the left side of the editing window, click the Advanced button to navigate to the Advanced screen.
- Scroll down to the section titled Attachments.
- Click the Add button on the right side, and use the file browser to find the key you created above. Look for the files called
git-signing-keyandgit-signing-key.pub, and add them both.
Once you have added the files to KeePassXC, you can delete them from your desktop. You will only be using them from KeePassXC from here onwards.
3. Tell KeePassXC that these are keys
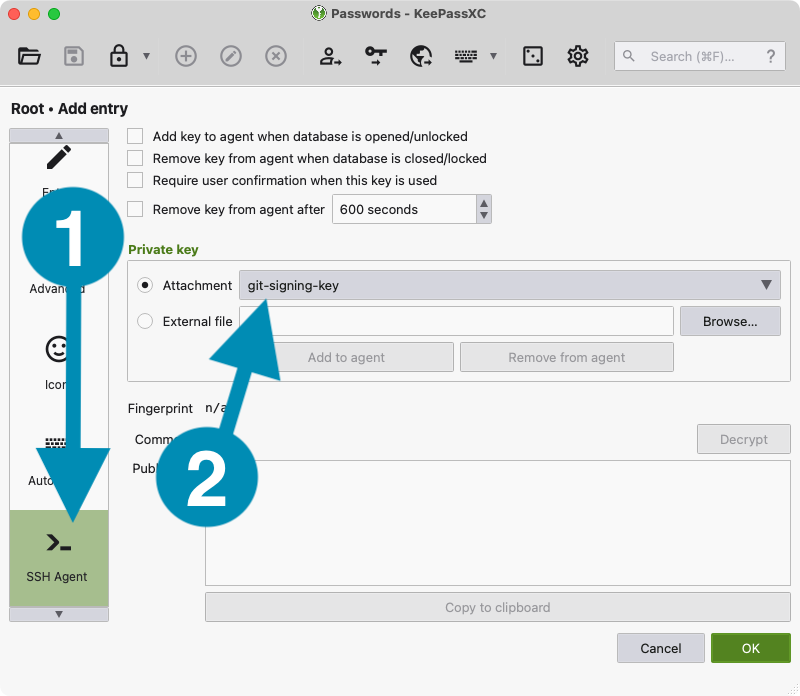
- Double-click to edit the entry that has the keys attached.
- Click the button that says SSH Agent on the left sidebar.
- Look for the section labeled Private key that includes a drop-down box labeled Attachment.
- Click in the drop-down box and select the private key you added as an attachment. The sections below should then populate with information such as "Fingerprint," "Comment," and "Public key."
- IMPORTANT: Use the private key, the one that is just
git-signing-key, not the public key!
- Click the OK button at the bottom to save your entry.
- Finally, right-click on your entry and click the option near the bottom of the pop-up menu that says Add key to SSH Agent.
Set up your keys manually
macOS
- Open a terminal window and enter the following command:
ssh-add --apple-use-keychain ~/.ssh/git-signing-key
- You will be prompted to enter the password you created for your key.
- Using the
--apple-use-keychainoption will store your password securely in the macOS keychain, where it will only be available when you are logged into your computer.
Linux
Open a terminal window and enter the following command:
ssh-add ~/.ssh/git-signing-key
You may be required to enter the password associated with your key every time you create a new git commit.
Re-adding the keys after a restart
3. Configure git to sign commits
By default, git uses a format called GPG for commit signing. However, GPG keys are more difficult to create and manage, so we recommend SSH keys, which is what you created in the previous steps.
- Tell git to use SSH keys instead of GPG keys. In a terminal, enter this command:
git config --global gpg.format ssh
- Next, tell git to sign your commits. Enter this command to enable commit signing in all of your repos by default:
git config --global commit.gpgsign true
1. Tell git about your key
Copy your public key from KeePassXC
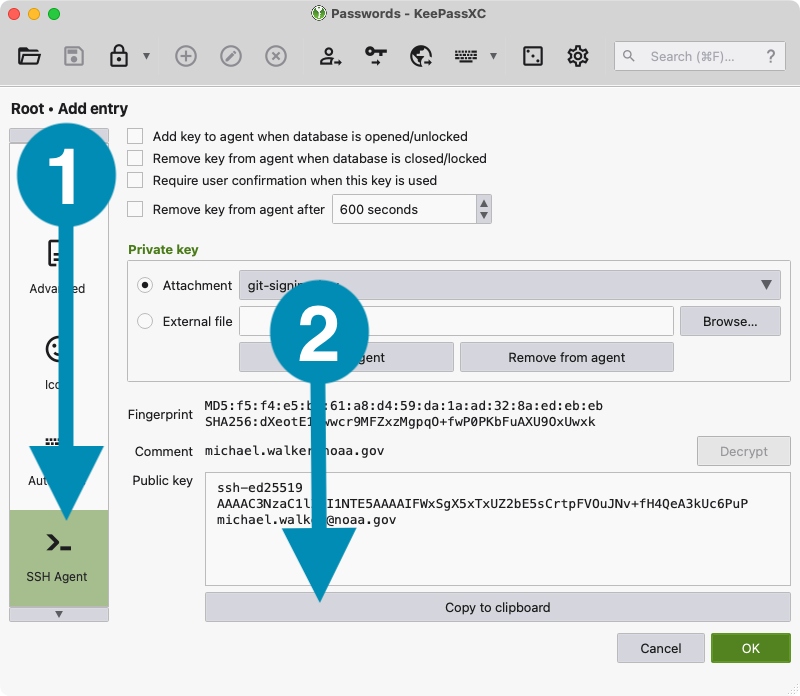
- Double-click to edit the KeePassXC entry that contains your keys.
- Click the button that says SSH Agent in the left sidebar.
- Find the large text area labeled Public key.
- Click on the Copy to clipboard button at the bottom to copy the public key.
- You will have 10 seconds to paste the key. KeePassXC clears the clipboard after 10 seconds.
- Back in your terminal window, enter this command:
git config --global user.signingkey "key::[PASTE]"
The key:: part is required! Paste your public key after the two colons. The key:: portion tells git that you are specifying a key directly. Otherwise, it assumes you are specifying a file that contains your key.
Tell git manually (without using KeePassXC)
Enter this command into a terminal window:
git config --global user.signingkey ~/.ssh/git-signing-key
2. Tell git your key is allowed
Before git will accept your key to sign a commit, the key must be listed in an "approved signers" list.
KeePassXC
- Copy your public key again.
- Enter this command in your terminal, using your own email address:
echo "[YOUR EMAIL]@gsa.gov [PASTE PUBLIC KEY]" >> ~/.gitsigners
Manually
Enter this command in your terminal, using your own email address:
echo "[YOUR EMAIL]@gsa.gov $(cat ~/.ssh/git-signing-key.pub)" >> ~/.gitsigners
4. Tell GitHub about your key
Git may be configured to sign your commits, but GitHub will mark them as Unverified and they will not be accepted under the Allstar policy.
In order to verify your signed commits, you must associate the public key with your GitHub account.
-
Go to your , external,GitHub SSH and GPG keys settings page.
-
Follow the , external,instructions provided by GitHub to add your signing key.
Add a signing key, not an authentication key
When you add your key to GitHub, it presents a drop-down for key types. By default, it will add an authentication key. Be sure to click the drop-down and select the signing key option instead.